How to Preserve Cattails: Food, Storage, and Decor Methods Explained
Learn how to preserve cattails for eating and decor. Typha ID, harvest safety, refrigerator pickles vs canning, drying shoots, and fixing dried heads without the fluff mess.

Important: This guide is for general education only. It is not medical or legal advice. Wild foods carry real risks from misidentification, polluted water, and improper home canning. When in doubt, skip the harvest or ask a local extension office or foraging instructor before you eat anything from a wetland.
Cattails (Typha species) show up in two very different searches. Some readers want to preserve cattails as food: shoots, pollen, or rhizomes for later meals. Others want to preserve cattail heads for decor: dried arrangements that do not shed fluff all over the house. A third search, how to preserve a cat tail, usually means taxidermy on a pet, not wetland plants. This article covers Typha only; see the FAQ for the homophone.
The goal is practical: choose a method that matches your outcome, stay inside food-safety rules, and avoid the common mistakes that turn a fun forage into a moldy jar or a lungful of seed fluff.
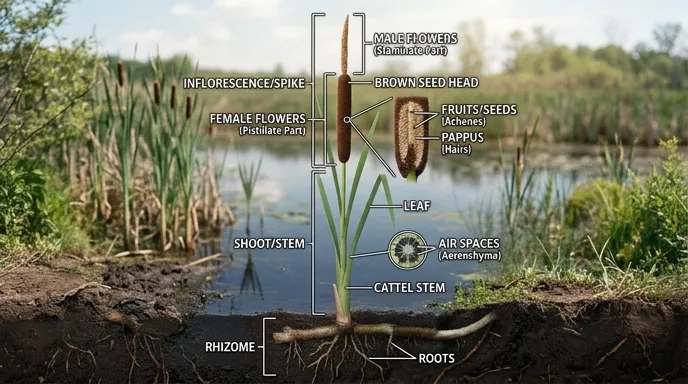
What Are Cattails and Which Parts Can You Preserve?
Cattails are tall wetland plants with sword-like leaves and brown, cigar-shaped flower spikes. In North America you will most often see broadleaf cattail (Typha latifolia) or narrowleaf cattail (Typha angustifolia). Hybrids occur where both grow together.
Parts people preserve include:
- Young shoots (sometimes called "Cossack asparagus") in spring, peeled and cooked or pickled
- Immature green flower spikes before they open, often boiled like corn
- Pollen from mature male flowers, dried as flour
- Rhizomes in late fall or winter, scrubbed and cooked or dried for flour
- Dried brown heads and leaves for arrangements, wreaths, or basketry
Each part has its own harvest window. Preserving the wrong stage (for example, a fully exploded seed head you hoped to eat) wastes time and can be unsafe if you confuse species.
Harvesting Safely and Legally
Harvest only where you have permission. Many public wetlands restrict plant collection. State parks, wildlife refuges, and city shorelines often prohibit picking entirely. On private land, get clear owner consent.
Best practices:
- Timing: Shoots are tenderest in early spring when you can pull the inner core from the sheath. Brown heads for decor are usually cut in late summer or fall before heavy rain beats them down.
- Tools: Sharp knife or hand pruners, breathable bags, gloves for wet mud.
- Take little: Leave most plants standing for wildlife and bank stability.
- Label at home: Note date, location, and part harvested so you remember what is in each jar or bundle.
Basket makers often dry leaves flat, then re-soak strips before weaving. That cycle is standard for craft material, not a food preservation shortcut.
Look-Alikes, Pollution, and When Not to Forage
Identification is non-negotiable. Young iris and some other wetland plants can sit near cattails and cause serious illness if eaten. Iris leaves often show a raised midrib and fan from the base in a flat plane; cattail leaves wrap the shoot in a tight spear. If you cannot tell with confidence, do not eat the plant.
Water quality matters as much as ID. Cattails filter wetlands. They can concentrate runoff, road salt, pesticides, and sewage. Do not harvest for food downstream of drains, feedlots, heavy agriculture, or urban storm outfalls. Decorative harvest from questionable water is also a poor idea if you will handle heads indoors without a mask.
Skip foraging when: rules forbid it, water looks oily or scummy, you are unsure of species, or anyone in the household has severe allergies to airborne pollen or dust.
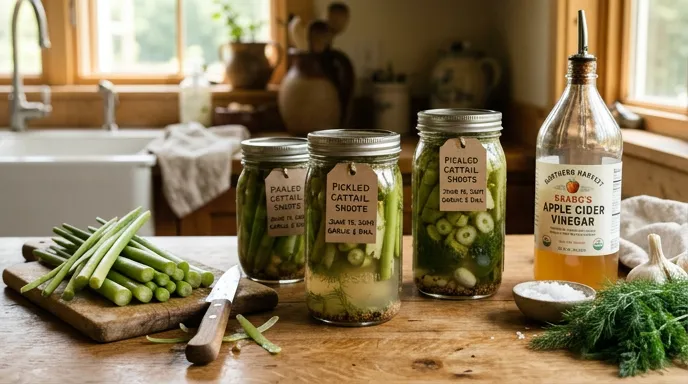
How Do You Preserve Cattails for Eating?
Edible preservation falls into three buckets: quick pickles in the refrigerator, freezing cooked shoots, and drying or flour-making for rhizomes and pollen. Shelf-stable jar pickles need tested acidified recipes. Most blog-style vinegar jars for cattail stalks are refrigerator pickles only unless you follow a lab-tested canning procedure for that exact vegetable and brine.
General food prep steps:
- Trim roots and outer leaves; keep only the white inner shoot.
- Wash in clean potable water. A brief blanch (about one minute in boiling water, then ice bath) reduces microbes before freezing or pickling.
- Process the same day when possible. Wet plant tissue spoils fast at room temperature.
Do not nibble raw shoots in the field without washing. Soil and animal contact on wetland plants are common.
Refrigerator Pickles vs Shelf-Stable Canning
Many online recipes mirror cucumber refrigerator pickles: vinegar, salt, spices, hot pack into jars, then chill. That is a reasonable short-term approach if you keep jars cold (about 40°F or below) and eat within a few weeks.
Do not treat untested vinegar recipes as pantry-shelf stable. Low-acid vegetables need precise acidity, processing time, and often pressure canning unless a trusted source documents a safe acidified formula for that crop. Botulism grows in sealed jars without oxygen; it does not smell bad. If you want shelf-stable pickles, use only recipes from university extension or the USDA Complete Guide to Home Canning, adapted by an expert for your ingredient.
| Method | Typical shelf life | Skill / risk |
|---|---|---|
| Refrigerator vinegar pickles | 2 to 6 weeks chilled | Lower risk if kept cold; not for the dry pantry |
| Freezing blanched shoots | About 8 to 12 months at 0°F | Texture softens; good for soups and stews |
| Dehydrated rhizome or pollen flour | Months in airtight jars if fully dry | Must reach safe dryness; check for mold |
| Untested "water bath" blog pickles | Unreliable | High botulism risk if sold as shelf-stable |
Drying and Freezing Cattail Shoots
Freezing: Blanch peeled shoots, drain well, pack in freezer bags with air removed, label with date. Use for cooked dishes; texture will not stay crisp like a fresh spear.
Drying: Slice thin, dehydrate at about 125 to 135°F until brittle, then condition in a jar (shake daily for a week) to check for moisture pockets. Fully dry pieces can be powdered for thickening soups. Rhizome drying follows the same rule: brittle, not leathery, before storage.
Pollen: Collect yellow pollen when flowers shed it, dry spread on trays, sift, and store airtight away from light.
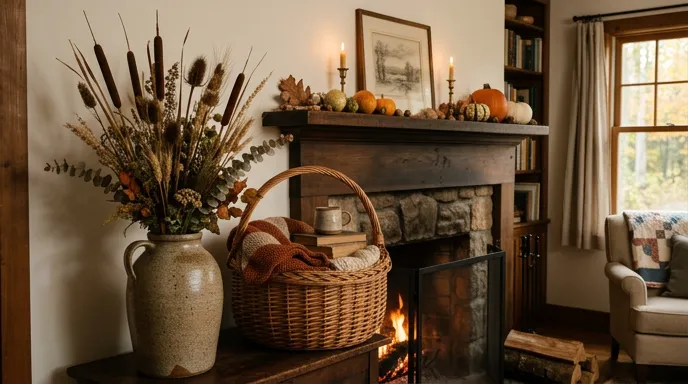
How to Preserve Cattails for Decor and Arrangements
Decor preservation targets the brown seed head (the "cattail") and sometimes leaves. The enemy is later seed explosion and mold from damp stems.
- Cut stems longer than you need; strip lower leaves that would sit in water.
- Bundle loosely and hang upside down in a dry, ventilated room out of direct sun for about two to three weeks until stems snap cleanly.
- Trim to final height for vases or wreaths.
Some makers lightly brush heads with clear acrylic sealer or hairspray to hold fluff. That is a craft finish, not food-safe. Always treat sprays as lung irritants (see next section).
Fixatives, Hairspray, and Ventilation Safety
Aerosol fixatives and hairspray can reduce shedding on dried heads. Evidence here is craft practice, not clinical study. Still, sensible rules apply:
- Work outdoors or in a garage with a breeze, not a closed bedroom.
- Wear a dust mask when handling bursting heads, even before spray.
- Keep sprays off food prep surfaces and utensils.
- Let coats dry fully before bringing arrangements indoors.
Low-chemical options include thorough air-drying plus display in a case or high shelf away from HVAC vents that restart fluff release.
Sand Drying and Preventing Seed Mess
Sand or silica gel drying is another decor route: stand stems in a deep container of dry sand so heads are surrounded but not crushed. This can slow moisture evenly. Change or dry sand if it clumps. The same ventilation rules apply. Do not reuse that sand for food.
To limit mess after drying, avoid bumping heads in tight doorways and store wrapped in paper, not plastic, until fully stable.
Basketry and Seed-Saving Basics
For weaving, harvest green leaves in summer, dry flat under weight so they stay straight, then store in a rodent-proof bin. Before weaving, soak until pliable. This is separate from food preservation but uses the same plant responsibly.
If you save seed for planting, use only where Typha is native and not listed as invasive in your region. Never dump unused fluff or rhizomes into natural waterways. Spread can choke native wetland plants.
Storage, Shelf Life, and Troubleshooting
| Problem | Likely cause | Fix |
|---|---|---|
| Mold in jar pickles | Weak acid, warm storage, contaminated jars | Discard entire jar; review cold storage only |
| Soft gray fuzz on dried heads | Dried too slowly in humid room | Discard affected pieces; redry future harvests with more airflow |
| Fluff everywhere indoors | Heads not dry or not sealed | Finish drying; light sealer outdoors; display in case |
| Mushy frozen shoots | Skipped blanch or thaw refreeze | Use in cooked dishes only; label dates |
Store dried decor away from direct sun to slow fading. Check bundles yearly for insects.
Quick Comparison: Which Method Fits Your Goal?
| Your goal | Best method | Time / effort |
|---|---|---|
| Try cattail pickles this month | Refrigerator vinegar pickles | Low; eat within weeks |
| Meals through winter | Freeze blanched shoots or dry flour | Medium |
| Fall centerpiece | Hang-dry heads, optional clear sealer | 2 to 3 weeks passive dry |
| Weaving material | Dry leaves flat, re-soak to weave | Season-long project |
| Pantry jars "like store pickles" | Only tested canning recipes from extension | High; must follow science |
When to Seek Professional Help
Call a poison control center or seek medical care if someone eats an unknown wetland plant or develops vomiting, trouble breathing, or severe allergy symptoms after handling cattail fluff. For home canning questions, contact your county extension office before you ship jars as gifts.
FAQ
How do you preserve cattails for long-term food storage?
For most households, freezing blanched shoots or fully drying rhizome or pollen flour is safer than experimental shelf-stable pickling. Refrigerator pickles are fine for weeks, not years. Use extension-tested canning only if you need room-temperature jars.
Can you pickle cattails like cucumbers?
You can pickle young shoots in vinegar brine for refrigerated storage, similar to quick pickles. Cucumber recipes do not automatically make cattails safe for the pantry shelf. Acidity, processing time, and crop matter all change risk.
How do you preserve cattails for decor without them exploding?
Harvest firm brown heads, hang upside down in a dry breezy space for two to three weeks, then optionally seal fluff with clear craft spray outdoors. Avoid plastic bags while moisture is still leaving the stem.
Is it safe to eat cattails from any pond?
No. Eat only from clean water after positive ID. When pollution or rules are uncertain, treat the plant as decor-only or leave it in place.
How long do preserved cattails last?
Refrigerator pickles: a few weeks. Frozen shoots: up to about a year at 0°F. Well-dried decor: often several seasons if kept dry and dust-free. Individual craft finishes vary.
How to preserve a cat tail (taxidermy) vs cattail plants?
Preserving a pet's tail is taxidermy or memorial craft, handled by specialists with very different chemicals and ethics. Typha cattails are wetland plants. The words sound alike; the methods are unrelated.
Do you need a water bath canner for cattail pickles?
Only if you follow a tested recipe designed for shelf stability. Many online cattail pickle posts skip the science you need for botulism prevention. When a recipe says "refrigerate only," believe it.
When is the best time to harvest cattails?
Shoots: early spring. Green flower spikes: late spring to early summer. Pollen: when male flowers shed. Rhizomes: late fall into winter. Brown decor heads: late summer through fall before heavy decay.
References
- Harvesting Cattails For Basketry: The Basics and Beyond | Katie Grove Studios
- How to Preserve Cattails and 3 Easy Ways to Make Arrangements | RusticWise
- Autumn Flowers: How to Preserve Cattails for Arrangements | Home to Heather
- Preserving Cattails for Indoor Arrangements | Stephie McCarthy
- Preserving Cattails | ThriftyFun
- How to Preserve Cattails for Autumn Decor | Creative Homemaking